一、time与datetime模块
在Python中,通常有这几种方式来表示时间
- 时间戳(timestamp):通常来说,时间戳表示的是从1970年1月1号00:00:00开始按照秒计算的偏移量。我们运行"type(time.time())",返回的是float类型。
- 格式化的时间字符串(Format String)
- 结构化的时间(struct_time):struct_time元组共有9个元素:(年,月,日,时,分,秒,一年中第几周,一年中第几天,夏令时)
import time#时间分为三种形式#1、时间戳 (timestamp)print(time.time()) # 时间戳start_time=time.time() #计算开始的描述time.sleep(3) #睡3秒stop_time=time.time() #计算结束时间print(stop_time-start_time) #计算结束时间-开始时间=时间差# 结果:1523170886.8069993.003127098083496#2、格式化的字符串 (Format String)print(time.strftime('%Y-%m-%d %H:%M:%S %p'))print(time.strftime('%Y-%m-%d %X %p'))#结果 也就说 %X = %H:%M:%S ,但是%H:%M:%S可以自定义拼接符号2018-04-08 15:01:29 PM2018-04-08 15:01:29 PM#3、struct_time对象print(time.localtime()) #上海:东八区print(time.localtime().tm_year) #年print(time.localtime().tm_mon) #月#结果time.struct_time(tm_year=2018, tm_mon=4, tm_mday=8, tm_hour=15, tm_min=26, tm_sec=32, tm_wday=6, tm_yday=98, tm_isdst=0)20184print(time.gmtime()) #UTC时区 与 东八区 相差8小时print(time.gmtime().tm_hour) #UTC时区 小时print(time.localtime().tm_hour) #东八区 小时#结果time.struct_time(tm_year=2018, tm_mon=4, tm_mday=8, tm_hour=7, tm_min=26, tm_sec=32, tm_wday=6, tm_yday=98, tm_isdst=0)715 时间格式:
| 格式 | 说明 |
|---|---|
| %a | 显示简化星期名称 |
| %A | 显示完整星期名称 |
| %b | 显示简化月份名称 |
| %B | 显示完整月份名称 |
| %c | 本地相应的日期和时间表示 |
| %d | 显示当月第几天 |
| %H | 按24小时制显示小时 |
| %I | 按12小时制显示小时 |
| %j | 显示当年第几天 |
| %m | 显示月份 |
| %M | 显示分钟数) |
| %p | 本地am或者pm的相应符 |
| %S | 显示秒数) |
| %U | 一年中的星期数 |
| %w | 显示在星期中的第几天,默认从0开始表示周一 |
| %W | 和%U基本相同 |
| %x | 本地相应日期 |
| %X | 本地相应时间 |
| %y | 去掉世纪的年份(00 - 99) |
| %Y | 完整的年份 |
| %z | 时区偏移指示从UTC / GMT格式+ HHMM或HHMM的积极或消极的时间差,其中H表示十进制小时数字和M代表十进制分位数[ 23:59,+ 23:59 ]。 |
| %Z | 时区的名字(如果不存在为空字符) |
| %% | ‘%’字符 |
转换关系
其中计算机认识的时间只能是‘时间戳‘格式,而程序员可处理的或者说人类能看懂的时间有:’格式化的时间字符串‘,’结构化的时间’,于是有了下图的转换关系:
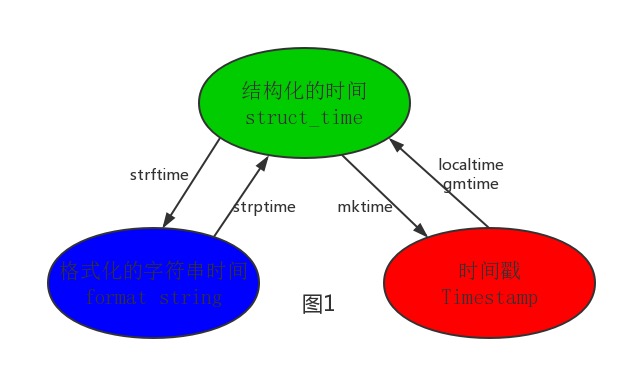
import time#-----------------------------------按图1转换时间#localtime([secs])#将一个时间戳转换为当前时区的struct_time。secs参数未提供,则已当前时间为准print(time.localtime())print(time.localtime().tm_year)print(time.localtime(1231231231))print(time.localtime(1231231231).tm_year)#结果time.struct_time(tm_year=2018, tm_mon=4, tm_mday=8, tm_hour=16, tm_min=0, tm_sec=32, tm_wday=6, tm_yday=98, tm_isdst=0)2018time.struct_time(tm_year=2009, tm_mon=1, tm_mday=6, tm_hour=16, tm_min=40, tm_sec=31, tm_wday=1, tm_yday=6, tm_isdst=0)2009# gmtime([secs]) 和localtime()方法类似,gmtime()方法是将一个时间戳转换为UTC时区(0时区)的struct_time。# mktime(t) : 将一个struct_time转化为时间戳。print(time.mktime(time.localtime()))#结果1523174502.0# strftime(format[, t]) : 把一个代表时间的元组或者struct_time(如由time.localtime()和time.gmtime()返回)转化为格式化的时间字符串。如果t未指定,将传入time.localtime()。如果元组中任何一个元素越界,ValueError的错误将会被抛出。#strftime()将struct_time对象转换为格式化的字符串print(time.strftime("%Y-%m-%d %X", time.localtime()))#2018-04-08 16:08:39# time.strptime(string[, format])#strptime将格式化的字符串转换为struct_time对象# 把一个格式化时间字符串转化为struct_time。实际上它和strftime()是逆操作。print(time.strptime('2017/04/08','%Y/%m/%d'))#time.struct_time(tm_year=2017, tm_mon=4, tm_mday=8, tm_hour=0, tm_min=0, tm_sec=0, tm_wday=5, tm_yday=98, tm_isdst=-1)#在这个函数中,format默认为:"%a %b %d %H:%M:%S %Y"。 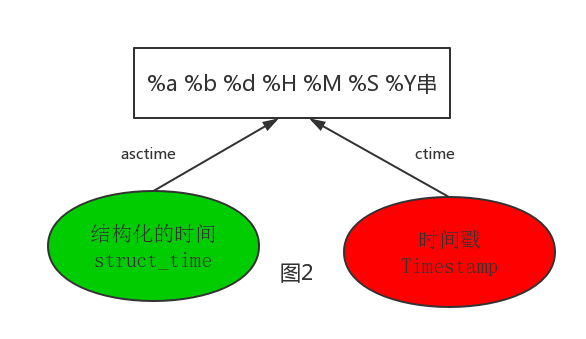
#--------------------------按图2转换时间# asctime([t]) : 把一个表示时间的元组或者struct_time表示为这种形式:'Sun Jun 20 23:21:05 1993'。# 如果没有参数,将会将time.localtime()作为参数传入。print(time.asctime())#Sun Sep 11 00:43:43 2016# ctime([secs]) : 把一个时间戳(按秒计算的浮点数)转化为time.asctime()的形式。如果参数未给或者为# None的时候,将会默认time.time()为参数。它的作用相当于time.asctime(time.localtime(secs))。print(time.ctime()) # Sun Sep 11 00:46:38 2016print(time.ctime(time.time())) # Sun Sep 11 00:46:38 2016
1 #--------------------------其他用法2 # sleep(secs)3 # 线程推迟指定的时间运行,单位为秒。
detetime模块
1 #时间加减 2 import datetime,time 3 4 print(datetime.datetime.now()) #返回 2016-08-19 12:47:03.941925 5 print(time.time()) 6 print(datetime.date.fromtimestamp(time.time()) ) # 时间戳直接转成日期格式 2016-08-19 7 print(datetime.datetime.now() ) 8 print(datetime.datetime.now() + datetime.timedelta(3)) #当前时间+3天 9 print(datetime.datetime.now() + datetime.timedelta(-3)) #当前时间-3天10 print(datetime.datetime.now() + datetime.timedelta(hours=3)) #当前时间+3小时11 print(datetime.datetime.now() + datetime.timedelta(minutes=30)) #当前时间+30分12 13 c_time = datetime.datetime.now()14 print(c_time.replace(minute=3,hour=2)) #时间替换
1 #结果如下 2 2018-04-08 16:26:10.768697 3 1523175970.768735 4 2018-04-08 5 2018-04-08 16:26:10.768762 6 2018-04-11 16:26:10.768769 7 2018-04-05 16:26:10.768781 8 2018-04-08 19:26:10.768800 9 2018-04-08 16:56:10.76880910 2018-04-08 02:03:10.768818
二、random模块
import random print(random.random())#(0,1)----float 大于0且小于1之间的小数 print(random.randint(1,3)) #[1,3] 大于等于1且小于等于3之间的整数 print(random.randrange(1,3)) #[1,3) 大于等于1且小于3之间的整数 print(random.choice([1,'23',[4,5]]))#1或者23或者[4,5] print(random.sample([1,'23',[4,5]],2))#列表元素任意2个组合 print(random.uniform(1,3))#大于1小于3的小数,如1.927109612082716 item=[1,3,5,7,9]random.shuffle(item) #打乱item的顺序,相当于"洗牌"print(item)
生成随机验证码


import randomdef make_code(n): res='' for i in range(n): s1=chr(random.randint(65,90)) s2=str(random.randint(0,9)) res+=random.choice([s1,s2]) return resprint(make_code(9))
三、os模块
os模块是与操作系统加护的一个接口
os常用函数、路径处理
os.getcwd() 获取当前工作目录,即当前python脚本工作的目录路径os.chdir("dirname") 改变当前脚本工作目录;相当于shell下cdos.curdir 返回当前目录: ('.')os.pardir 获取当前目录的父目录字符串名:('..')os.makedirs('dirname1/dirname2') 可生成多层递归目录os.removedirs('dirname1') 若目录为空,则删除,并递归到上一级目录,如若也为空,则删除,依此类推os.mkdir('dirname') 生成单级目录;相当于shell中mkdir dirnameos.rmdir('dirname') 删除单级空目录,若目录不为空则无法删除,报错;相当于shell中rmdir dirnameos.listdir('dirname') 列出指定目录下的所有文件和子目录,包括隐藏文件,并以列表方式打印os.remove() 删除一个文件os.rename("oldname","newname") 重命名文件/目录os.stat('path/filename') 获取文件/目录信息os.sep 输出操作系统特定的路径分隔符,win下为"\\",Linux下为"/"os.linesep 输出当前平台使用的行终止符,win下为"\t\n",Linux下为"\n"os.pathsep 输出用于分割文件路径的字符串 win下为;,Linux下为:os.name 输出字符串指示当前使用平台。win->'nt'; Linux->'posix'os.system("bash command") 运行shell命令,直接显示os.environ 获取系统环境变量os.path.abspath(path) 返回path规范化的绝对路径os.path.split(path) 将path分割成目录和文件名二元组返回os.path.dirname(path) 返回path的目录。其实就是os.path.split(path)的第一个元素os.path.basename(path) 返回path最后的文件名。如何path以/或\结尾,那么就会返回空值。即os.path.split(path)的第二个元素os.path.exists(path) 如果path存在,返回True;如果path不存在,返回Falseos.path.isabs(path) 如果path是绝对路径,返回Trueos.path.isfile(path) 如果path是一个存在的文件,返回True。否则返回Falseos.path.isdir(path) 如果path是一个存在的目录,则返回True。否则返回Falseos.path.join(path1[, path2[, ...]]) 将多个路径组合后返回,第一个绝对路径之前的参数将被忽略os.path.getatime(path) 返回path所指向的文件或者目录的最后存取时间os.path.getmtime(path) 返回path所指向的文件或者目录的最后修改时间os.path.getsize(path) 返回path的大小 os模块常用函数
在Linux和Mac平台上,该函数会原样返回path,在windows平台上会将路径中所有字符转换为小写,并将所有斜杠转换为饭斜杠。>>> os.path.normcase('c:/windows\\system32\\') 'c:\\windows\\system32\\' 规范化路径,如..和/>>> os.path.normpath('c://windows\\System32\\../Temp/') 'c:\\windows\\Temp' >>> a='/Users/jieli/test1/\\\a1/\\\\aa.py/../..'>>> print(os.path.normpath(a))/Users/jieli/test1 os路径处理#方式一:推荐使用import os#具体应用import os,syspossible_topdir = os.path.normpath(os.path.join( os.path.abspath(__file__), os.pardir, #上一级 os.pardir, os.pardir))sys.path.insert(0,possible_topdir)#方式二:不推荐使用os.path.dirname(os.path.dirname(os.path.dirname(os.path.abspath(__file__))))
四、sys模块
sys.argv 命令行参数List,第一个元素是程序本身路径sys.exit(n) 退出程序,正常退出时exit(0)sys.version 获取Python解释程序的版本信息sys.maxint 最大的Int值sys.path 返回模块的搜索路径,初始化时使用PYTHONPATH环境变量的值sys.platform 返回操作系统平台名称
#=========知识储备==========#进度条的效果[# ][## ][### ][#### ]#指定宽度print('[%-15s]' %'#')print('[%-15s]' %'##')print('[%-15s]' %'###')print('[%-15s]' %'####')#打印%print('%s%%' %(100)) #第二个%号代表取消第一个%的特殊意义#可传参来控制宽度print('[%%-%ds]' %50) #[%-50s]print(('[%%-%ds]' %50) %'#')print(('[%%-%ds]' %50) %'##')print(('[%%-%ds]' %50) %'###')#=========实现打印进度条函数==========import sysimport timedef progress(percent,width=50): if percent >= 1: percent=1 show_str=('[%%-%ds]' %width) %(int(width*percent)*'#') print('\r%s %d%%' %(show_str,int(100*percent)),file=sys.stdout,flush=True,end='')#=========应用==========data_size=1025recv_size=0while recv_size < data_size: time.sleep(0.1) #模拟数据的传输延迟 recv_size+=1024 #每次收1024 percent=recv_size/data_size #接收的比例 progress(percent,width=70) #进度条的宽度70打印进度条
五、shutil模块
高级的 文件、文件夹、压缩包 处理模块
文件、文件夹处理
shutil.copyfileobj(fsrc,fdst,length)
将文件内容拷贝到另一个文件中
import shutilshutil.copyfileobj(open('egon.xml','r'), open('allen.xml', 'w')) #被复制文件'r'读,另一文件'w'写
shutil.copyfile(src, dst)
拷贝文件1 shutil.copyfile('f1.log', 'f2.log') #目标文件无需存在
shutil.copymode(src, dst)
仅拷贝权限。内容、组、用户均不变1 shutil.copymode('f1.log', 'f2.log') #目标文件必须存在
shutil.copystat(src, dst)
仅拷贝状态的信息,包括:mode bits, atime, mtime, flags1 shutil.copystat('f1.log', 'f2.log') #目标文件必须存在
shutil.copy(src, dst)
拷贝文件和权限1 import shutil2 3 shutil.copy('f1.log', 'f2.log')
shutil.copy2(src, dst)
拷贝文件和状态信息1 import shutil2 3 shutil.copy2('f1.log', 'f2.log')
shutil.ignore_patterns(*patterns)
shutil.copytree(src, dst, symlinks=False, ignore=None)递归的去拷贝文件夹1 import shutil2 3 shutil.copytree('folder1', 'folder2', ignore=shutil.ignore_patterns('*.pyc', 'tmp*')) #目标目录不能存在,注意对folder2目录父级目录要有可写权限,ignore的意思是排除 import shutilshutil.copytree('f1', 'f2', symlinks=True, ignore=shutil.ignore_patterns('*.pyc', 'tmp*'))'''通常的拷贝都把软连接拷贝成硬链接,即对待软连接来说,创建新的文件''' shutil.rmtree(path[, ignore_errors[, onerror]])
递归的去删除文件1 import shutil2 3 shutil.rmtree('folder1')
shutil.move(src, dst)
递归的去移动文件,它类似mv命令,其实就是重命名。1 import shutil2 3 shutil.move('folder1', 'folder3') 压缩
shutil.make_archive(base_name, format,...)
创建压缩包并返回文件路径,例如:zip、tar
创建压缩包并返回文件路径,例如:zip、tar
- base_name: 压缩包的文件名,也可以是压缩包的路径。只是文件名时,则保存至当前目录,否则保存至指定路径,如 data_bak =>保存至当前路径如:/tmp/data_bak =>保存至/tmp/
- format: 压缩包种类,“zip”, “tar”, “bztar”,“gztar”
- root_dir: 要压缩的文件夹路径(默认当前目录)
- owner: 用户,默认当前用户
- group: 组,默认当前组
- logger: 用于记录日志,通常是logging.Logger对象
1 #将 /data 下的文件打包放置当前程序目录2 import shutil3 ret = shutil.make_archive("data_bak", 'gztar', root_dir='/data')4 5 6 #将 /data下的文件打包放置 /tmp/目录7 import shutil8 ret = shutil.make_archive("/tmp/data_bak", 'gztar', root_dir='/data') shutil 对压缩包的处理是调用 ZipFile 和 TarFile 两个模块来进行的,详细:
import zipfile# 压缩z = zipfile.ZipFile('laxi.zip', 'w')z.write('a.log')z.write('data.data')z.close()# 解压z = zipfile.ZipFile('laxi.zip', 'r')z.extractall(path='.')z.close() import tarfile# 压缩>>> t=tarfile.open('/tmp/egon.tar','w')>>> t.add('/test1/a.py',arcname='a.bak')>>> t.add('/test1/b.py',arcname='b.bak')>>> t.close()# 解压>>> t=tarfile.open('/tmp/egon.tar','r')>>> t.extractall('/egon')>>> t.close()
六、json&pickle模块
之前我们学习过用eval内置方法可以将一个字符串转成python对象,不过,eval方法是有局限性的,对于普通的数据类型,json.loads和eval都能用,但遇到特殊类型的时候,eval就不管用了,所以eval的重点还是通常用来执行一个字符串表达式,并返回表达式的值。
import jsonx="[null,true,false,1]"print(eval(x)) #报错,无法解析null类型,而json就可以print(json.loads(x))
什么是序列化?
我们把对象(变量)从内存中变成可存储或传输的过程称之为序列化,在Python中叫pickling,在其他语言中也被称之为serialization,marshalling,flattening等等,都是一个意思。
为什么要序列化?
1:持久保存状态
需知一个软件/程序的执行就在处理一系列状态的变化,在编程语言中,'状态'会以各种各样有结构的数据类型(也可简单的理解为变量)的形式被保存在内存中。
内存是无法永久保存数据的,当程序运行了一段时间,我们断电或者重启程序,内存中关于这个程序的之前一段时间的数据(有结构)都被清空了。
在断电或重启程序之前将程序当前内存中所有的数据都保存下来(保存到文件中),以便于下次程序执行能够从文件中载入之前的数据,然后继续执行,这就是序列化。
具体的来说,你玩使命召唤闯到了第13关,你保存游戏状态,关机走人,下次再玩,还能从上次的位置开始继续闯关。或如,虚拟机状态的挂起等。
2:跨平台数据交互
序列化之后,不仅可以把序列化后的内容写入磁盘,还可以通过网络传输到别的机器上,如果收发的双方约定好实用一种序列化的格式,那么便打破了平台/语言差异化带来的限制,实现了跨平台数据交互。
反过来,把变量内容从序列化的对象重新读到内存里称之为反序列化,即unpickling。
如何序列化之json和pickle:
json
json可以跨平台
如果我们要在不同的编程语言之间传递对象,就必须把对象序列化为标准格式,比如XML,但更好的方法是序列化为JSON,因为JSON表示出来就是一个字符串,可以被所有语言读取,也可以方便地存储到磁盘或者通过网络传输。JSON不仅是标准格式,并且比XML更快,而且可以直接在Web页面中读取,非常方便。
JSON表示的对象就是标准的JavaScript语言的对象,JSON和Python内置的数据类型对应如下:


import json dic={ 'name':'alvin','age':23,'sex':'male'}print(type(dic))# j=json.dumps(dic)print(type(j))# f=open('序列化对象','w')f.write(j) #-------------------等价于json.dump(dic,f)f.close()#-----------------------------反序列化 import jsonf=open('序列化对象')data=json.loads(f.read())# 等价于data=json.load(f) import json#dct="{'1':111}"#json 不认单引号#dct=str({"1":111})#报错,因为生成的数据还是单引号:{'one': 1}dct='{"1":"111"}'print(json.loads(dct))#conclusion:# 无论数据是怎样创建的,只要满足json格式,就可以json.loads出来,不一定非要dumps的数据才能loads 注意点 pickle

import pickle dic={ 'name':'alvin','age':23,'sex':'male'} print(type(dic))# j=pickle.dumps(dic)print(type(j))# f=open('序列化对象_pickle','wb')#注意是w是写入str,wb是写入bytes,j是'bytes'f.write(j) #-------------------等价于pickle.dump(dic,f) f.close()#-------------------------反序列化import picklef=open('序列化对象_pickle','rb') data=pickle.loads(f.read())# 等价于data=pickle.load(f) print(data['age'])
七、shelve模块
shelve模块比picle模块简单,只有一个open函数,返回类似字典的对象,刻度科协;key必须为字符串,而值可以是python所支持的数据类型
import shelvef=shelve.open(r'sheve.txt')# f['stu1_info']={'name':'egon','age':18,'hobby':['piao','smoking','drinking']}# f['stu2_info']={'name':'gangdan','age':53}# f['school_info']={'website':'http://www.pypy.org','city':'beijing'}print(f['stu1_info']['hobby'])f.close()
八、xml模块
xml是实现不同语言或程序之间进行数据交换的协议,跟json差不多,但json使用起来更简单,不过,古时候,在json还没诞生的黑暗年代,大家只能选择用xml呀,至今很多传统公司如金融行业的很多系统的接口还主要是xml。
xml的格式如下,就是通过<>节点来区别数据结构的:
2 2008 141100 5 2011 59900 xml数据 69 2011 13600
xml协议在各个语言里的都 是支持的,在python中可以用以下模块操作xml:
print(root.iter('year')) #全文搜索print(root.find('country')) #在root的子节点找,只找一个print(root.findall('country')) #在root的子节点找,找所有
import xml.etree.ElementTree as ET tree = ET.parse("xmltest.xml")root = tree.getroot()print(root.tag) #遍历xml文档for child in root: print('========>',child.tag,child.attrib,child.attrib['name']) for i in child: print(i.tag,i.attrib,i.text) #只遍历year 节点for node in root.iter('year'): print(node.tag,node.text)#---------------------------------------import xml.etree.ElementTree as ET tree = ET.parse("xmltest.xml")root = tree.getroot() #修改for node in root.iter('year'): new_year=int(node.text)+1 node.text=str(new_year) node.set('updated','yes') node.set('version','1.0')tree.write('test.xml') #删除nodefor country in root.findall('country'): rank = int(country.find('rank').text) if rank > 50: root.remove(country) tree.write('output.xml') #在country内添加(append)节点year2import xml.etree.ElementTree as ETtree = ET.parse("a.xml")root=tree.getroot()for country in root.findall('country'): for year in country.findall('year'): if int(year.text) > 2000: year2=ET.Element('year2') year2.text='新年' year2.attrib={ 'update':'yes'} country.append(year2) #往country节点下添加子节点tree.write('a.xml.swap') 自己创建xml文档:
import xml.etree.ElementTree as ET new_xml = ET.Element("namelist")name = ET.SubElement(new_xml,"name",attrib={ "enrolled":"yes"})age = ET.SubElement(name,"age",attrib={ "checked":"no"})sex = ET.SubElement(name,"sex")sex.text = '33'name2 = ET.SubElement(new_xml,"name",attrib={ "enrolled":"no"})age = ET.SubElement(name2,"age")age.text = '19' et = ET.ElementTree(new_xml) #生成文档对象et.write("test.xml", encoding="utf-8",xml_declaration=True) ET.dump(new_xml) #打印生成的格式
九、configparser模块
配置文件如下:
# 注释1; 注释2[section1]k1 = v1k2:v2user=egonage=18is_admin=truesalary=31[section2]k1 = v1
十二、logging模块
日志级别
CRITICAL = 50 #FATAL = CRITICALERROR = 40WARNING = 30 #WARN = WARNINGINFO = 20DEBUG = 10NOTSET = 0 #不设置
默认级别为warning,默认打印到终端
import logginglogging.debug('调试debug')logging.info('消息info')logging.warning('警告warn')logging.error('错误error')logging.critical('严重critical')'''WARNING:root:警告warnERROR:root:错误errorCRITICAL:root:严重critical''' 为logging模块指定全局配置,针对所有logger有效,控制打印到文件中
可在logging.basicConfig()函数中通过具体参数来更改logging模块默认行为,可用参数有filename:用指定的文件名创建FiledHandler(后边会具体讲解handler的概念),这样日志会被存储在指定的文件中。filemode:文件打开方式,在指定了filename时使用这个参数,默认值为“a”还可指定为“w”。format:指定handler使用的日志显示格式。 datefmt:指定日期时间格式。 level:设置rootlogger(后边会讲解具体概念)的日志级别 stream:用指定的stream创建StreamHandler。可以指定输出到sys.stderr,sys.stdout或者文件,默认为sys.stderr。若同时列出了filename和stream两个参数,则stream参数会被忽略。#格式%(name)s:Logger的名字,并非用户名,详细查看%(levelno)s:数字形式的日志级别%(levelname)s:文本形式的日志级别%(pathname)s:调用日志输出函数的模块的完整路径名,可能没有%(filename)s:调用日志输出函数的模块的文件名%(module)s:调用日志输出函数的模块名%(funcName)s:调用日志输出函数的函数名%(lineno)d:调用日志输出函数的语句所在的代码行%(created)f:当前时间,用UNIX标准的表示时间的浮 点数表示%(relativeCreated)d:输出日志信息时的,自Logger创建以 来的毫秒数%(asctime)s:字符串形式的当前时间。默认格式是 “2003-07-08 16:49:45,896”。逗号后面的是毫秒%(thread)d:线程ID。可能没有%(threadName)s:线程名。可能没有%(process)d:进程ID。可能没有%(message)s:用户输出的消息
#======介绍可在logging.basicConfig()函数中可通过具体参数来更改logging模块默认行为,可用参数有filename:用指定的文件名创建FiledHandler(后边会具体讲解handler的概念),这样日志会被存储在指定的文件中。filemode:文件打开方式,在指定了filename时使用这个参数,默认值为“a”还可指定为“w”。format:指定handler使用的日志显示格式。datefmt:指定日期时间格式。level:设置rootlogger(后边会讲解具体概念)的日志级别stream:用指定的stream创建StreamHandler。可以指定输出到sys.stderr,sys.stdout或者文件,默认为sys.stderr。若同时列出了filename和stream两个参数,则stream参数会被忽略。format参数中可能用到的格式化串:%(name)s Logger的名字%(levelno)s 数字形式的日志级别%(levelname)s 文本形式的日志级别%(pathname)s 调用日志输出函数的模块的完整路径名,可能没有%(filename)s 调用日志输出函数的模块的文件名%(module)s 调用日志输出函数的模块名%(funcName)s 调用日志输出函数的函数名%(lineno)d 调用日志输出函数的语句所在的代码行%(created)f 当前时间,用UNIX标准的表示时间的浮 点数表示%(relativeCreated)d 输出日志信息时的,自Logger创建以 来的毫秒数%(asctime)s 字符串形式的当前时间。默认格式是 “2003-07-08 16:49:45,896”。逗号后面的是毫秒%(thread)d 线程ID。可能没有%(threadName)s 线程名。可能没有%(process)d 进程ID。可能没有%(message)s用户输出的消息#========使用import logginglogging.basicConfig(filename='access.log', format='%(asctime)s - %(name)s - %(levelname)s -%(module)s: %(message)s', datefmt='%Y-%m-%d %H:%M:%S %p', level=10)logging.debug('调试debug')logging.info('消息info')logging.warning('警告warn')logging.error('错误error')logging.critical('严重critical')#========结果access.log内容:2017-07-28 20:32:17 PM - root - DEBUG -test: 调试debug2017-07-28 20:32:17 PM - root - INFO -test: 消息info2017-07-28 20:32:17 PM - root - WARNING -test: 警告warn2017-07-28 20:32:17 PM - root - ERROR -test: 错误error2017-07-28 20:32:17 PM - root - CRITICAL -test: 严重criticalpart2: 可以为logging模块指定模块级的配置,即所有logger的配置 logging模块的Formatter,Handler,Logger,Filter对象
#logger:产生日志的对象#Filter:过滤日志的对象#Handler:接收日志然后控制打印到不同的地方,FileHandler用来打印到文件中,StreamHandler用来打印到终端#Formatter对象:可以定制不同的日志格式对象,然后绑定给不同的Handler对象使用,以此来控制不同的Handler的日志格式
'''critical=50error =40warning =30info = 20debug =10'''import logging#1、logger对象:负责产生日志,然后交给Filter过滤,然后交给不同的Handler输出logger=logging.getLogger(__file__)#2、Filter对象:不常用,略#3、Handler对象:接收logger传来的日志,然后控制输出h1=logging.FileHandler('t1.log') #打印到文件h2=logging.FileHandler('t2.log') #打印到文件h3=logging.StreamHandler() #打印到终端#4、Formatter对象:日志格式formmater1=logging.Formatter('%(asctime)s - %(name)s - %(levelname)s -%(module)s: %(message)s', datefmt='%Y-%m-%d %H:%M:%S %p',)formmater2=logging.Formatter('%(asctime)s : %(message)s', datefmt='%Y-%m-%d %H:%M:%S %p',)formmater3=logging.Formatter('%(name)s %(message)s',)#5、为Handler对象绑定格式h1.setFormatter(formmater1)h2.setFormatter(formmater2)h3.setFormatter(formmater3)#6、将Handler添加给logger并设置日志级别logger.addHandler(h1)logger.addHandler(h2)logger.addHandler(h3)logger.setLevel(10)#7、测试logger.debug('debug')logger.info('info')logger.warning('warning')logger.error('error')logger.critical('critical')
Logger与Handler的级别
logger是第一级过滤,然后才能到handler,我们可以给logger和handler同时设置level,但是需要注意的是
Logger is also the first to filter the message based on a level — if you set the logger to INFO, and all handlers to DEBUG, you still won't receive DEBUG messages on handlers — they'll be rejected by the logger itself. If you set logger to DEBUG, but all handlers to INFO, you won't receive any DEBUG messages either — because while the logger says "ok, process this", the handlers reject it (DEBUG < INFO).记录器也是第一个基于级别过滤消息的程序——如果您将记录器设置为信息,并且所有调试程序都要调试,那么您仍然不会收到处理程序上的调试消息——它们将被记录器本身拒绝。如果您将记录器设置为调试,但对信息的所有处理程序,则您也不会收到任何调试消息——因为当记录器说“OK,处理此”时,处理程序拒绝它(调试
Logger的继承(了解)
import loggingformatter=logging.Formatter('%(asctime)s - %(name)s - %(levelname)s -%(module)s: %(message)s', datefmt='%Y-%m-%d %H:%M:%S %p',)ch=logging.StreamHandler()ch.setFormatter(formatter)logger1=logging.getLogger('root')logger2=logging.getLogger('root.child1')logger3=logging.getLogger('root.child1.child2')logger1.addHandler(ch)logger2.addHandler(ch)logger3.addHandler(ch)logger1.setLevel(10)logger2.setLevel(10)logger3.setLevel(10)logger1.debug('log1 debug')logger2.debug('log2 debug')logger3.debug('log3 debug')'''2017-07-28 22:22:05 PM - root - DEBUG -test: log1 debug2017-07-28 22:22:05 PM - root.child1 - DEBUG -test: log2 debug2017-07-28 22:22:05 PM - root.child1 - DEBUG -test: log2 debug2017-07-28 22:22:05 PM - root.child1.child2 - DEBUG -test: log3 debug2017-07-28 22:22:05 PM - root.child1.child2 - DEBUG -test: log3 debug2017-07-28 22:22:05 PM - root.child1.child2 - DEBUG -test: log3 debug'''
应用
"""logging配置"""import osimport logging.config# 定义三种日志输出格式 开始standard_format = '[%(asctime)s][%(threadName)s:%(thread)d][task_id:%(name)s][%(filename)s:%(lineno)d]' \ '[%(levelname)s][%(message)s]' #其中name为getlogger指定的名字simple_format = '[%(levelname)s][%(asctime)s][%(filename)s:%(lineno)d]%(message)s'id_simple_format = '[%(levelname)s][%(asctime)s] %(message)s'# 定义日志输出格式 结束logfile_dir = os.path.dirname(os.path.abspath(__file__)) # log文件的目录logfile_name = 'all2.log' # log文件名# 如果不存在定义的日志目录就创建一个if not os.path.isdir(logfile_dir): os.mkdir(logfile_dir)# log文件的全路径logfile_path = os.path.join(logfile_dir, logfile_name)# log配置字典LOGGING_DIC = { 'version': 1, 'disable_existing_loggers': False, 'formatters': { 'standard': { 'format': standard_format }, 'simple': { 'format': simple_format }, }, 'filters': {}, 'handlers': { #打印到终端的日志 'console': { 'level': 'DEBUG', 'class': 'logging.StreamHandler', # 打印到屏幕 'formatter': 'simple' }, #打印到文件的日志,收集info及以上的日志 'default': { 'level': 'DEBUG', 'class': 'logging.handlers.RotatingFileHandler', # 保存到文件 'formatter': 'standard', 'filename': logfile_path, # 日志文件 'maxBytes': 1024*1024*5, # 日志大小 5M 'backupCount': 5, 'encoding': 'utf-8', # 日志文件的编码,再也不用担心中文log乱码了 }, }, 'loggers': { #logging.getLogger(__name__)拿到的logger配置 '': { 'handlers': ['default', 'console'], # 这里把上面定义的两个handler都加上,即log数据既写入文件又打印到屏幕 'level': 'DEBUG', 'propagate': True, # 向上(更高level的logger)传递 }, },}def load_my_logging_cfg(): logging.config.dictConfig(LOGGING_DIC) # 导入上面定义的logging配置 logger = logging.getLogger(__name__) # 生成一个log实例 logger.info('It works!') # 记录该文件的运行状态if __name__ == '__main__': load_my_logging_cfg()logging配置文件
"""MyLogging Test"""import timeimport loggingimport my_logging # 导入自定义的logging配置logger = logging.getLogger(__name__) # 生成logger实例def demo(): logger.debug("start range... time:{}".format(time.time())) logger.info("中文测试开始。。。") for i in range(10): logger.debug("i:{}".format(i)) time.sleep(0.2) else: logger.debug("over range... time:{}".format(time.time())) logger.info("中文测试结束。。。")if __name__ == "__main__": my_logging.load_my_logging_cfg() # 在你程序文件的入口加载自定义logging配置 demo()使用 注意注意注意:#1、有了上述方式我们的好处是:所有与logging模块有关的配置都写到字典中就可以了,更加清晰,方便管理#2、我们需要解决的问题是: 1、从字典加载配置:logging.config.dictConfig(settings.LOGGING_DIC) 2、拿到logger对象来产生日志 logger对象都是配置到字典的loggers 键对应的子字典中的 按照我们对logging模块的理解,要想获取某个东西都是通过名字,也就是key来获取的 于是我们要获取不同的logger对象就是 logger=logging.getLogger('loggers子字典的key名') 但问题是:如果我们想要不同logger名的logger对象都共用一段配置,那么肯定不能在loggers子字典中定义n个key 'loggers': { 'l1': { 'handlers': ['default', 'console'], # 'level': 'DEBUG', 'propagate': True, # 向上(更高level的logger)传递 }, 'l2: { 'handlers': ['default', 'console' ], 'level': 'DEBUG', 'propagate': False, # 向上(更高level的logger)传递 }, 'l3': { 'handlers': ['default', 'console'], # 'level': 'DEBUG', 'propagate': True, # 向上(更高level的logger)传递 },} #我们的解决方式是,定义一个空的key 'loggers': { '': { 'handlers': ['default', 'console'], 'level': 'DEBUG', 'propagate': True, },}这样我们再取logger对象时logging.getLogger(__name__),不同的文件__name__不同,这保证了打印日志时标识信息不同,但是拿着该名字去loggers里找key名时却发现找不到,于是默认使用key=''的配置!!!关于如何拿到logger对象的详细解释!!! 另外一个django的配置,瞄一眼就可以,跟上面的一样
#logging_config.pyLOGGING = { 'version': 1, 'disable_existing_loggers': False, 'formatters': { 'standard': { 'format': '[%(asctime)s][%(threadName)s:%(thread)d][task_id:%(name)s][%(filename)s:%(lineno)d]' '[%(levelname)s][%(message)s]' }, 'simple': { 'format': '[%(levelname)s][%(asctime)s][%(filename)s:%(lineno)d]%(message)s' }, 'collect': { 'format': '%(message)s' } }, 'filters': { 'require_debug_true': { '()': 'django.utils.log.RequireDebugTrue', }, }, 'handlers': { #打印到终端的日志 'console': { 'level': 'DEBUG', 'filters': ['require_debug_true'], 'class': 'logging.StreamHandler', 'formatter': 'simple' }, #打印到文件的日志,收集info及以上的日志 'default': { 'level': 'INFO', 'class': 'logging.handlers.RotatingFileHandler', # 保存到文件,自动切 'filename': os.path.join(BASE_LOG_DIR, "xxx_info.log"), # 日志文件 'maxBytes': 1024 * 1024 * 5, # 日志大小 5M 'backupCount': 3, 'formatter': 'standard', 'encoding': 'utf-8', }, #打印到文件的日志:收集错误及以上的日志 'error': { 'level': 'ERROR', 'class': 'logging.handlers.RotatingFileHandler', # 保存到文件,自动切 'filename': os.path.join(BASE_LOG_DIR, "xxx_err.log"), # 日志文件 'maxBytes': 1024 * 1024 * 5, # 日志大小 5M 'backupCount': 5, 'formatter': 'standard', 'encoding': 'utf-8', }, #打印到文件的日志 'collect': { 'level': 'INFO', 'class': 'logging.handlers.RotatingFileHandler', # 保存到文件,自动切 'filename': os.path.join(BASE_LOG_DIR, "xxx_collect.log"), 'maxBytes': 1024 * 1024 * 5, # 日志大小 5M 'backupCount': 5, 'formatter': 'collect', 'encoding': "utf-8" } }, 'loggers': { #logging.getLogger(__name__)拿到的logger配置 '': { 'handlers': ['default', 'console', 'error'], 'level': 'DEBUG', 'propagate': True, }, #logging.getLogger('collect')拿到的logger配置 'collect': { 'handlers': ['console', 'collect'], 'level': 'INFO', } },}# -----------# 用法:拿到俩个loggerlogger = logging.getLogger(__name__) #线上正常的日志collect_logger = logging.getLogger("collect") #领导说,需要为领导们单独定制领导们看的日志
十三、re模块
一:什么是正则?
正则就是用一些具有特殊含义的符号组合到一起(称为正则表达式)来描述字符或者字符串的方法。或者说:正则就是用来描述一类事物的规则。(在Python中)它内嵌在Python中,并通过 re 模块实现。正则表达式模式被编译成一系列的字节码,然后由用 C 编写的匹配引擎执行。
生活中处处都是正则:
比如我们描述:4条腿
你可能会想到的是四条腿的动物或者桌子,椅子等
继续描述:4条腿,活的
就只剩下四条腿的动物这一类了
二:常用匹配模式(元字符)
http://blog.csdn.net/yufenghyc/article/details/51078107
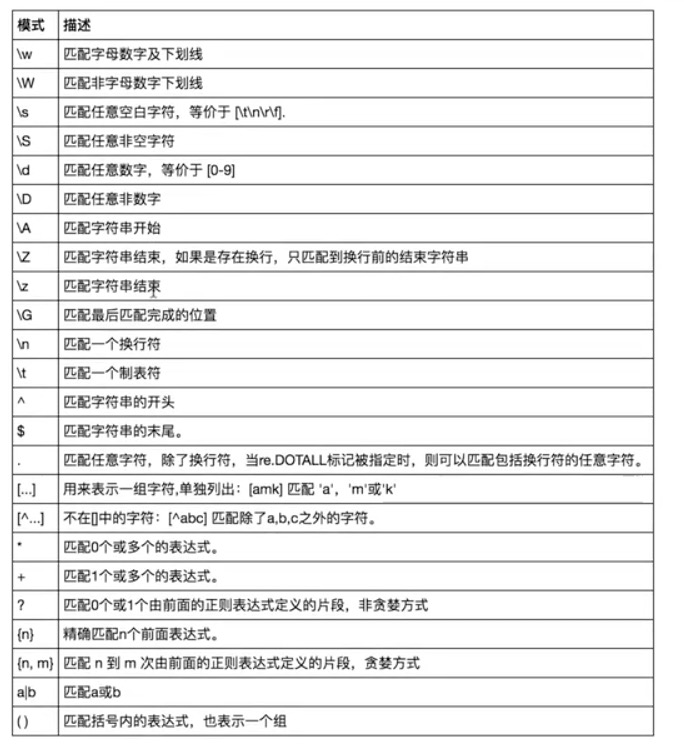
# =================================匹配模式=================================#一对一的匹配print('hello'.replace('hello','allen hello'))print('hello'.find('l'))#allen hello#2#正则匹配import reprint(re.findall('\w','ab 12\+- *&_'))print(re.findall('\W','ab 12\+- *&_'))# ['a', 'b', '1', '2', '_']# [' ', '\\', '+', '-', ' ', '*', '&']print(re.findall('\s','ab 12\+- *&_'))print(re.findall('\S','ab 12\+- *&_'))# [' ', ' ']# ['a', 'b', '1', '2', '\\', '+', '-', '*', '&', '_']print(re.findall('\d','ab 12\+- *&_'))print(re.findall('\D','ab 12\+- *&_'))# ['1', '2']# ['a', 'b', ' ', '\\', '+', '-', ' ', '*', '&', '_']print(re.findall('^egon$','egon'))print(re.findall('^egon$','egon 121 egon'))# ['egon']# []print(re.findall('\Aalex','dbadalex is salexbbe'))print(re.findall('\Aalex','alex is salexbbe'))# []# ['alex']print(re.findall('sb\Z','alexsb is dasdaalexsb'))print(re.findall('a.c','abc alc aAC aaaaac'))# ['sb']# ['abc', 'alc', 'aac']#5、{m,n}:代表左边拿一个字符出现m次到n次print(re.findall('ab?','a ab abb abbb abbbb abbbb'))print(re.findall('ab{0,1}','a ab abb abbb abbbb abbbb'))# ['a', 'ab', 'ab', 'ab', 'ab', 'ab']# ['a', 'ab', 'ab', 'ab', 'ab', 'ab']print(re.findall('ab*','a ab abb abbb abbbb abbbb'))print(re.findall('ab{0,}','a ab abb abbb abbbb abbbb')) #0,没参数就是无穷的意思# ['a', 'ab', 'abb', 'abbb', 'abbbb', 'abbbb']# ['a', 'ab', 'abb', 'abbb', 'abbbb', 'abbbb']print(re.findall('ab+','a ab abb abbb abbbb abbbb'))print(re.findall('ab{1,}','a ab abb abbb abbbb abbbb'))# ['ab', 'abb', 'abbb', 'abbbb', 'abbbb']# ['ab', 'abb', 'abbb', 'abbbb', 'abbbb']print(re.findall('alex_sb','alex_sb asdasdalex_sb'))print(re.findall('(alex)_sb','alex_sb asdasdalex_sb'))# ['alex_sb', 'alex_sb']# ['alex', 'alex']print(re.findall('href="(.*?)"','墨颜丶
'))#['http://www.cnblogs.com/moyand/']print(re.findall('a[0-9][0-9]c','a1c a+c a2c a9c a11c a-c acc aAca'))print(re.findall('a[0-9]c','a1c a+c a2c a9c a11c a-c acc aAca'))# ['a11c']# ['a1c', 'a2c', 'a9c']# 重复匹配:| . | * | ? | .* | .*? | + | {n,m} |#.print(re.findall('a.b','a1b')) #['a1b']print(re.findall('a.b','a1b a*b a b aaab')) #['a1b', 'a*b', 'a b', 'aab']print(re.findall('a.b','a\nb')) #[]print(re.findall('a.b','a\nb',re.S)) #['a\nb']print(re.findall('a.b','a\nb',re.DOTALL)) #['a\nb']同上一条意思一样#*print(re.findall('ab*','bbbbbbb')) #[]print(re.findall('ab*','a')) #['a']print(re.findall('ab*','abbbb')) #['abbbb']#?print(re.findall('ab?','a')) #['a']print(re.findall('ab?','abbb')) #['ab']#匹配所有包含小数在内的数字print(re.findall('\d+\.?\d*',"asdfasdf123as1.13dfa12adsf1asdf3")) #['123', '1.13', '12', '1', '3']#.*默认为贪婪匹配print(re.findall('a.*b','a1b22222222b')) #['a1b22222222b']#.*?为非贪婪匹配:推荐使用print(re.findall('a.*?b','a1b22222222b')) #['a1b']#+print(re.findall('ab+','a')) #[]print(re.findall('ab+','abbb')) #['abbb']#{n,m}print(re.findall('ab{2}','abbb')) #['abb']print(re.findall('ab{2,4}','abbb')) #['abb']print(re.findall('ab{1,}','abbb')) #'ab{1,}' ===> 'ab+'print(re.findall('ab{0,}','abbb')) #'ab{0,}' ===> 'ab*'#[]print(re.findall('a[1*-]b','a1b a*b a-b')) #[]内的都为普通字符了,且如果-没有被转意的话,应该放到[]的开头或结尾print(re.findall('a[^1*-]b','a1b a*b a-b a=b')) #[]内的^代表的意思是取反,所以结果为['a=b']print(re.findall('a[0-9]b','a1b a*b a-b a=b')) #[]内的^代表的意思是取反,所以结果为['a=b']print(re.findall('a[a-z]b','a1b a*b a-b a=b aeb')) #[]内的^代表的意思是取反,所以结果为['a=b']print(re.findall('a[a-zA-Z]b','a1b a*b a-b a=b aeb aEb')) #[]内的^代表的意思是取反,所以结果为['a=b']#\# print(re.findall('a\\c','a\c')) #对于正则来说a\\c确实可以匹配到a\c,但是在python解释器读取a\\c时,会发生转义,然后交给re去执行,所以抛出异常print(re.findall(r'a\\c','a\c')) #r代表告诉解释器使用rawstring,即原生字符串,把我们正则内的所有符号都当普通字符处理,不要转义print(re.findall('a\\\\c','a\c')) #同上面的意思一样,和上面的结果一样都是['a\\c']#():分组print(re.findall('ab+','ababab123')) #['ab', 'ab', 'ab']print(re.findall('(ab)+123','ababab123')) #['ab'],匹配到末尾的ab123中的abprint(re.findall('(?:ab)+123','ababab123')) #findall的结果不是匹配的全部内容,而是组内的内容,?:可以让结果为匹配的全部内容print(re.findall('href="(.*?)"','点击'))#['http://www.baidu.com']print(re.findall('href="(?:.*?)"','点击'))#['href="http://www.baidu.com"']#|print(re.findall('compan(?:y|ies)','Too many companies have gone bankrupt, and the next one is my company'))
# ===========================re模块提供的方法介绍===========================import re#1print(re.findall('e','alex make love') ) #['e', 'e', 'e'],返回所有满足匹配条件的结果,放在列表里#2print(re.search('e','alex make love').group()) #e,只到找到第一个匹配然后返回一个包含匹配信息的对象,该对象可以通过调用group()方法得到匹配的字符串,如果字符串没有匹配,则返回None。#3print(re.match('e','alex make love')) #None,同search,不过在字符串开始处进行匹配,完全可以用search+^代替match#4print(re.split('[ab]','abcd')) #['', '', 'cd'],先按'a'分割得到''和'bcd',再对''和'bcd'分别按'b'分割#5print('===>',re.sub('a','A','alex make love')) #===> Alex mAke love,不指定n,默认替换所有print('===>',re.sub('a','A','alex make love',1)) #===> Alex make loveprint('===>',re.sub('a','A','alex make love',2)) #===> Alex mAke loveprint('===>',re.sub('^(\w+)(.*?\s)(\w+)(.*?\s)(\w+)(.*?)$',r'\5\2\3\4\1','alex make love')) #===> love make alexprint('===>',re.subn('a','A','alex make love')) #===> ('Alex mAke love', 2),结果带有总共替换的个数#6obj=re.compile('\d{2}')print(obj.search('abc123eeee').group()) #12print(obj.findall('abc123eeee')) #['12'],重用了obj import reprint(re.findall("<(?P \w+)>\w+ "," hello
")) #['h1']print(re.search("<(?P \w+)>\w+ "," hello
").group()) # hello
print(re.search("<(?P \w+)>\w+ "," hello
").groupdict()) # hello
print(re.search(r"<(\w+)>\w+ "," hello
").group())print(re.search(r"<(\w+)>\w+ "," hello
").group()) import reprint(re.findall(r'-?\d+\.?\d*',"1-12*(60+(-40.35/5)-(-4*3))")) #找出所有数字['1', '-12', '60', '-40.35', '5', '-4', '3']#使用|,先匹配的先生效,|左边是匹配小数,而findall最终结果是查看分组,所有即使匹配成功小数也不会存入结果#而不是小数时,就去匹配(-?\d+),匹配到的自然就是,非小数的数,在此处即整数print(re.findall(r"-?\d+\.\d*|(-?\d+)","1-2*(60+(-40.35/5)-(-4*3))")) #找出所有整数['1', '-2', '60', '', '5', '-4', '3']
#计算器作业参考:http://www.cnblogs.com/wupeiqi/articles/4949995.htmlexpression='1-2*((60+2*(-3-40.0/5)*(9-2*5/3+7/3*99/4*2998+10*568/14))-(-4*3)/(16-3*2))' content=re.search('\(([\-\+\*\/]*\d+\.?\d*)+\)',expression).group() #(-3-40.0/5) #为何同样的表达式search与findall却有不同结果:print(re.search('\(([\+\-\*\/]*\d+\.?\d*)+\)',"1-12*(60+(-40.35/5)-(-4*3))").group()) #(-40.35/5)print(re.findall('\(([\+\-\*\/]*\d+\.?\d*)+\)',"1-12*(60+(-40.35/5)-(-4*3))")) #['/5', '*3']#看这个例子:(\d)+相当于(\d)(\d)(\d)(\d)...,是一系列分组print(re.search('(\d)+','123').group()) #group的作用是将所有组拼接到一起显示出来print(re.findall('(\d)+','123')) #findall结果是组内的结果,且是最后一个组的结果 #_*_coding:utf-8_*___author__ = 'Linhaifeng'#在线调试工具:tool.oschina.net/regex/#import res='''http://www.baidu.comegon@oldboyedu.com你好010-3141'''#最常规匹配# content='Hello 123 456 World_This is a Regex Demo'# res=re.match('Hello\s\d\d\d\s\d{3}\s\w{10}.*Demo',content)# print(res)# print(res.group())# print(res.span())#泛匹配# content='Hello 123 456 World_This is a Regex Demo'# res=re.match('^Hello.*Demo',content)# print(res.group())#匹配目标,获得指定数据# content='Hello 123 456 World_This is a Regex Demo'# res=re.match('^Hello\s(\d+)\s(\d+)\s.*Demo',content)# print(res.group()) #取所有匹配的内容# print(res.group(1)) #取匹配的第一个括号内的内容# print(res.group(2)) #去陪陪的第二个括号内的内容#贪婪匹配:.*代表匹配尽可能多的字符# import re# content='Hello 123 456 World_This is a Regex Demo'## res=re.match('^He.*(\d+).*Demo$',content)# print(res.group(1)) #只打印6,因为.*会尽可能多的匹配,然后后面跟至少一个数字#非贪婪匹配:?匹配尽可能少的字符# import re# content='Hello 123 456 World_This is a Regex Demo'## res=re.match('^He.*?(\d+).*Demo$',content)# print(res.group(1)) #只打印6,因为.*会尽可能多的匹配,然后后面跟至少一个数字#匹配模式:.不能匹配换行符content='''Hello 123456 World_Thisis a Regex Demo'''# res=re.match('He.*?(\d+).*?Demo$',content)# print(res) #输出None# res=re.match('He.*?(\d+).*?Demo$',content,re.S) #re.S让.可以匹配换行符# print(res)# print(res.group(1))#转义:\# content='price is $5.00'# res=re.match('price is $5.00',content)# print(res)## res=re.match('price is \$5\.00',content)# print(res)#总结:尽量精简,详细的如下 # 尽量使用泛匹配模式.* # 尽量使用非贪婪模式:.*? # 使用括号得到匹配目标:用group(n)去取得结果 # 有换行符就用re.S:修改模式#re.search:会扫描整个字符串,不会从头开始,找到第一个匹配的结果就会返回# import re# content='Extra strings Hello 123 456 World_This is a Regex Demo Extra strings'## res=re.match('Hello.*?(\d+).*?Demo',content)# print(res) #输出结果为None## import re# content='Extra strings Hello 123 456 World_This is a Regex Demo Extra strings'## res=re.search('Hello.*?(\d+).*?Demo',content) ## print(res.group(1)) #输出结果为#re.search:只要一个结果,匹配演练,import recontent=''' 1  ',content)# print(res.group(1))#re.findall:找到符合条件的所有结果# res=re.findall('
 ',content)# for i in res:# print(i)#re.sub:字符串替换import recontent='Extra strings Hello 123 456 World_This is a Regex Demo Extra strings'# content=re.sub('\d+','',content)# print(content)#用\1取得第一个括号的内容#用法:将123与456换位置# import re# content='Extra strings Hello 123 456 World_This is a Regex Demo Extra strings'## # content=re.sub('(Extra.*?)(\d+)(\s)(\d+)(.*?strings)',r'\1\4\3\2\5',content)# content=re.sub('(\d+)(\s)(\d+)',r'\3\2\1',content)# print(content)# import re# content='Extra strings Hello 123 456 World_This is a Regex Demo Extra strings'## res=re.search('Extra.*?(\d+).*strings',content)# print(res.group(1))# import requests,re# respone=requests.get('https://book.douban.com/').text# print(respone)# print('======'*1000)# print('======'*1000)# print('======'*1000)# print('======'*1000)# res=re.findall(' .*?more-meta.*?author">(.*?)(.*?)(.*?)',respone,re.S)# # res=re.findall(' (.*?)(.*?)(.*?) .*?',respone,re.S)### for i in res:# print('%s %s %s %s' %(i[0].strip(),i[1].strip(),i[2].strip(),i[3].strip()))